Educaship Jitsi
(Redirected from CNM Talkware)
Educaship Jitsi (formerly known as CNM Talkware; hereinafter, the Soft) is a CNM stable app built with Jitsi. The Soft is the CNM app that is configured to power CNM Talk, TalkHandsOn, or TalkNext service of CNMCyber. The App is based on commercial off-the-shelf (COTS) webconferencing software, Jitsi. The App is a part of Opplet.
Contents
Challenges
Guys, we are looking for one or more Jitsi experts to resolve one or more of the challenges that are best described below. Screening question: Have you found the description of the challenges? May you resolve one or more of them? Which one or ones?
Impared
- Video quality impaired. The bridge channel has been disconnected and thus video quality is limited to its lowest setting.
Load balancer
- We are looking for solutions to implement a load balancer in CNM Jitsi instances. We are considering several approaches and want to find the best one: 1) put the Jibri on separate bare metals, 2) put the Jitsi Videobridge on separate bare metals, 3) put the Jitsi Meet on separate bare metals, 4) your suggestion. Now all the apps/elements of the Jitsi that were installed along with the Jitsi meet are installed on the same bare metal.
- What is the best host to put the balancer to make it work as best as possible: Docker, Hetzner, DigitalOcean, or Contabo? Maybe keep one balancer as is, on Educaship Proxmox, and another on another host?
- At the moment, we use the high availability (or HA) feature on CNM Bureau Farm that is powered by Educaship Proxmox. Its HA allows for migrating the instance between several computing servers in cases of emergency. For instance, if the bare-metal server that hosts the instance at the moment fails, HA shall automatically move the instance to another server without any interruption. In plain English, the videoconference participants will not notice any change in the instance when the instance's computer fails.
Hosting
- How is it better to be hosted? Are CPU, RAM, and SSD important? Which is more important than others?
- Dockers, other containers, or full application?
- Jibri vs Jitsi-Meet hosting
LDAP integration
- We have authorization from LDAP. But it would be good if the login of a registered user was automatically displayed as a name in the conference.
Live streaming
- Can we integrate Jitsi with YouTube, OBS Studio, and/or AVideo for streaming? And how? We want to add the button "Start Live Stream" to our Jitsi instances. Enable live streaming functionality on the Soft platform.
Guided tour
- We use the CNMCyber Guided Tours format and need someone to organize an event that would present the Soft. The event should feature:
- A speaker and/or presenter who would demonstrate a separate, so-called experiential, instance of the Soft, while following its description. The participants shall follow the presentation, try the Soft instance on their own, ask questions, and get the speaker/presenter answers.
- Recording that would be published online by the team.
Subtitles
- We want to add the possibility of simultaneous translation, i.e. subtitles, during conferences to Jitsi's instances. Is this realistic? Do you have any suggestions?
Product specification
- The Product specifications are:
- What distinguishes Educaship Jitsi from Jitsi:
- Educaship Jitsi has LDAP authentication. To do this, we made a change to the configuration file, where we disabled internal authorization and enabled LDAP. More about how we have connected LDAP authentication see below.
- Educaship Jitsi instances are installed on CNM Bureau Farm that features high availability (or HA) powered by Educaship Proxmox.
- Educaship Jitsi does not use the Jigasi (Jitsi Gateway to SIP) - server-side application that allows regular SIP clients to join Jitsi Meet conferences. More about standard Jitsi structure - Jitsi.
Software instances
- The software instance that powers core, hands-on training, and experiential systems.
- Core Jitsi -- CNM Talk
- HOTCOE Jitsi -- TalkHandsOn
- Inplz Jitsi -- TalkNext (bskol), TalkNext (hotcoe), TalkNext (employableu), TalkNext
Version
- The current version of the CNM Jitsi instances is 2.0.8615, which was updated on 2023/05/18.
Security
- In order to achieve the safety of our instances we don't use the standard login - admin, don't use the standard user and we disabled user registration directly on instances by switching the LDAP registration to Opplet. How to enable LDAP authentication, read here.
Standing operating procedures
Monitoring process
- Monitoring is done by using Educaship Nagios, not on CNM Jitsi. Read more: Educaship Nagios.
Backup
- Usually, the main backup is done on the farm, not on CNM Jitsi. So you can read more about backup on CNM Bureau Farm.
Snapshot
- Snapshots are made by hand on the farm, not on CNM Jitsi. Read more: CNM Bureau Farm.
System installation
- How to install & Configure Jitsi on Ubuntu:
- Log in to your server as the non-root, sudo-enabled user before starting
- Pre-Instalation
- apt update -y && apt upgrade -y
- apt install lsb-release -y
- apt install gnupg -y
- apt install curl -y
- apt install ufw -y
- Now you will change the system’s hostname to match the domain name you intend to use for your Jitsi Meet instance. You will also locally resolve that hostname to your server’s public IP. Jitsi Meet uses both settings when it installs and generates its configuration files. First, set the system’s hostname to the domain name that you will use for your Jitsi instance. The following command will set the current hostname and modify the /etc/hostname that holds the system’s hostname between reboots:
- hostnamectl set-hostname talk.cnmcyber.com
- nano /etc/hosts
127.0.0.1 localhost ::1 localhost ip6-localhost ip6-loopback ff02::1 ip6-allnodes ff02::2 ip6-allrouters
- #- --- BEGIN PVE ---
- 2a01:4f8:fff0:53::2 talk.cnmcyber.com jitsi
- # --- END PVE --
- ufw allow 80/tcp
- ufw allow 443/tcp
- ufw allow 10000/udp ==> For General Network Audio/Video Meetings
- ufw allow 22/tcp
- ufw allow 3478/udp ==> For querying the stun server (coturn, optional, needs config.js change to enable it).
- ufw allow 5349/tcp ==> For fallback network video/audio communications over TCP (when UDP is blocked for example), served by coturn.
- ufw enable
- ufw status
- Save and close the file. Your server now has the hostname and IP address setting Jitsi requires when installed.
- Install Nginx
- # apt-get install nginx -y
- # systemctl start nginx
- # systemctl enable nginx
- # nginx -v
- # ufw allow 'Nginx Full'
- Installation Jitsi
- apt install -y openjdk-8-jre-headless
- java -version
- echo "JAVA_HOME=$(readlink -f /usr/bin/java | sed "s:bin/java::")" | sudo tee -a
- /etc/profile
- source /etc/profile
- apt install -y nginx
- systemctl start nginx.service
- systemctl enable nginx.service
- wget -qO - https:*****.gpg.key | sudo apt-key add -
- echo "deb https://download.jitsi.org stable/" | sudo tee -a
- /etc/apt/sources.list.d/jitsi-stable.list
- apt update
- apt install -y jitsi-meet
- Install SSL Let's Encrypt
- /usr/share/jitsi-meet/scripts/install-letsencrypt-cert.sh
- Enter your email and press [ENTER]: ***
- Create a Password Authenticate Users to a Meeting
- Create a guest domain
- cd /etc/prosody/conf.avail/
- nano talk.cnmcyber.com.cfg.lua
- ------------------------------------------
- VirtualHost "talk.cnmcyber.com"
- ...
- authentication = "anonymous" //change anonymous to internal_plain
- ...
- add above VirtualHost section, insert a new VirtualHost section.
- ------------------------------------------
- VirtualHost "guest.talk.cnmcyber.com"
- authentication = "anonymous"
- c2s_require_encryption = false
- modules_enabled = {
- "bosh";
- "pubsub";
- "ping";
- "speakerstats";
- "turncredentials";
- "conference_duration";
- }
- ------------------------------------------
- exit
- Install Module Storage_memory
- #enables a temporary memory storage for persistent information, including #user
- session data
- apt install -y mercurial
- mkdir ~/temp && cd ~/temp
- hg clone ' https://hg.prosody.im/prosody-modules/ ' prosody-modules
- cp prosody-modules/mod_storage_memory/*.lua /usr/lib/prosody/modules/.
- Create a Jitsi Anonymous Domain
- nano /etc/jitsi/meet/talk.cnmcyber.com-config.js
- ------------------------------------------
- var config = {
- ...
- hosts: {
- ...
- domain: 'talk.cnmcyber.com',
- anonymousdomain: '***',
- ...
- },
- ...
- }
- ------------------------------------------
- Configure Jicofo
- nano /etc/jitsi/jicofo/sip-communicator.properties
- -------------------------------------------
- Add a new line with the following configuration.
- org.jitsi.jicofo.auth.URL=XMPP:talk.cnmcyber.com
- Create Jitsi admin users
- prosodyctl register adminjitsi talk.cnmcyber.com *****
- prosodyctl register administrator talk.cnmcyber.com *****
- prosodyctl register jitsi1 talk.cnmcyber.com *****
- prosodyctl register jitsitalk talk.cnmcyber.com *****
- prosodyctl register jitsimeet talk.cnmcyber.com *****
- systemctl restart {prosody,jicofo,jitsi-videobridge2,nginx}
Customization
- To customize certain elements of Jitsi, you should:
- open the server where Jitsi is installed in Terminal;
- open the Midnight Commander by using the command root@jitsi:/home/jitsi# mc;
- open catalog /usr (click /.. -> /.. -> /usr);
- open catalog /share -> /jitsi-meet
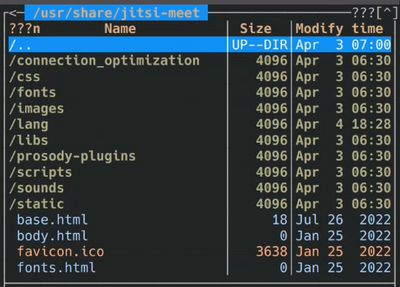
- Here you can select the file or folder you want to change. Press F4 to edit:

- In the interface_config.js file you can change:
- company name to CNMCyber as the value of APP_NAME variable;
- default participant's name, if a user does not enter his/her name, as the value of DEFAULT_REMOTE_DISPLAY_NAME variable;
- direction to another website when someone clicks on the logo by adding cnmcyber.com as the value of 'BRAND_WATERMARK_LINK' parameter;
- In the images folder you can change:
- favicon; you should add an image to the repository and rename it as favicon.ico and then add the desired icon to jitsi-meet/images folder with .ico extension. You can also change it in jitsi-meet/favicon.ico file.
- logo; you should convert a desired logo into a .svg file and rename it as watermark.svg. Then add that .svg file into jitsi-meet/images/images folder. You also don't have to change the name of the new logo, but in this case, you should change the name of the logo file in DEFAULT_LOGO_URL and DEFAULT_WELCOME_PAGE_LOGO_URL parameters.
- homepage background image by adding the desired image to jitsi-meet/images folder. You can also customize the homepage background image with your company image in variables.scss file [jitsi-meet/css/_variables.scss].
- In the main.json, main-enGB.json and title.html files ([jitsi-meet/lang/main.json], [jitsi-meet/lang/main-enGB.json], [jitsi-meet/title.html]) you can change:
- title and description by opening the main.json file and searching for "appDescription", "headerTitle", "headerSubtitle", "title".Then make the necessary changes in each of the three files.
LDAP authentication

- To connect LDAP authentication you should connect an application called Sasl. To set up Sasl authentication you should:
- open the server where Jitsi is installed in Terminal;
- open the Midnight Commander by using the command root@jitsi:/home/jitsi# mc;
- open catalog /etc -> /saslauthd.conf file.
- The file looks like this:
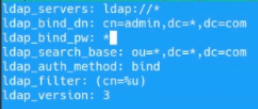
- In this file, we specify the server, the administrator's login and password, and the database. We use a separate server for LDAP.
- After that we can change the authentication mechanism. To do this:

- in catalog /etc select /sasl folder -> /xmpp.conf file:
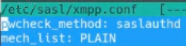
- Here we change the method to saslauthd.conf (how it shows in the picture). And after that make sure to restart the service and restart the Prosody bt using the command jitsi@jitsi:/ect/sasl$ systemctl restart prosody in Terminal.
Version
- You can find information about new updates at https://hub.docker.com/
Hands-on assignments
- Hands-on assignments that CNM learners can use to get accustomed to the software while using its hands-on training systems and applications.
Presentations
- CNM WordPress was presented at a series of events called CNMCyber Guided Tours and CNM Technology Board:
- Guided Tour of CNM Jitsi 2023-3-29
- Guided Tour of CNM Jitsi 2023-4-5
- CNM Tech Board 2023-04-12
- CNM Tech Board 2023-04-19
User group
- CNM Social user group has not yet been created; the group may organize software-related events and produce newsletters.
Architecture
- The App is a BigBlueButton instance that is run on the CNM Farms on a separate server.
Server requirements
- The minimum server requirements for installing BigBlueButton 1.1 are:
- Ubuntu 16.04 64-bit OS;
- 4 GB of memory with swap enabled (8 GB of memory is better);
- Quad-core 2.6 GHZ CPU (or faster);
- TCP ports 80, 443, and 1935 are accessible;
- TCP port 7443 is accessible if you intend to configure SSL (recommended), otherwise port 5066 is Accessible;
- UDP ports 16384 - 32768 are accessible;
- Port 80 is not in use by another application.
- The minimum server requirements for installing BigBlueButton 1.1 are:
- Additional requirements are:
- 500G of free disk space (or more) for recordings;
- 100 Mbits / Sec bandwidth (symmetrical);
- Dedicated (bare metal) hardware (not virtualized)
- Additional requirements are:
Availability
| CNM app | Available to: | |||||||
| Everyone | Everyone registered | Customer | Student | Partner or Vendor | Employee | Developer | Admin | |
|---|---|---|---|---|---|---|---|---|
| The App | No | Yes | Yes | Yes | Yes | Yes | Yes | Yes |
See also
- https://blog.mi.hdm-stuttgart.de/index.php/2021/03/11/how-to-scale-jitsi-meet/
- https://www.digitalocean.com/community/tutorials/how-to-install-jitsi-meet-on-ubuntu-22-04
Development
- Development of the Soft occurs under the Jitsi for CNM Cloud project.